
Blog written by DAVID RODRIG, Certified SAP SuccessFactors Solutions Consultant
There have been many blogs on integrating SAP SuccessFactors employees into Qualtrics 360° project. Although most of these blogs are well written, I find that many details are missing and an average SuccessFactors / Qualtrics consultant needs to spend hours reading and understanding Help documents from both Qualtrics and SuccessFactors support sites to piece together the right solution.
In this blog, I will list all the relevant steps needed when integrating SuccessFactors users to the Qualtrics survey platform.
Prerequisites
- Super Admin privilege in SuccessFactors instance
- SuccessFactors SFTP login credentials
- Qualtrics instance URL (it looks like: https://instancename.qualtrics.com)
- In Qualtrics, Brand Administrator permission
SuccessFactors configuration
Start by enabling Qualtrics integration:
In SuccessFactors click upgrade center

Then search and click for Qualtrics Employee experience

Click upgrade now

Make sure that you have your Qualtrics’ instance URL, then paste it into dialog and press Validate
The address should look like this: https://instancename.qualtrics.com

When validated, click Yes

When finished, click OK

Now, go to Platform Feature Setting and make sure that Enable Qualtrics Feature is checked

In the following steps you will set the RBP permission in SuccessFactors.
Open your Super Admin permission roll, under Admin Center Permissions and check the following:
- Access Qualtrics Integration
- Show Qualtrics in Main Navigation menu (check only if you want to see link to Qualtrics in the SuccessFactors menu)
- Click Done and Save Changes

Object definitions
Before continuing, you should check that that the Qualtrics object definitions are correctly configured. In most of the cases you do not need to change any configuration in this part.
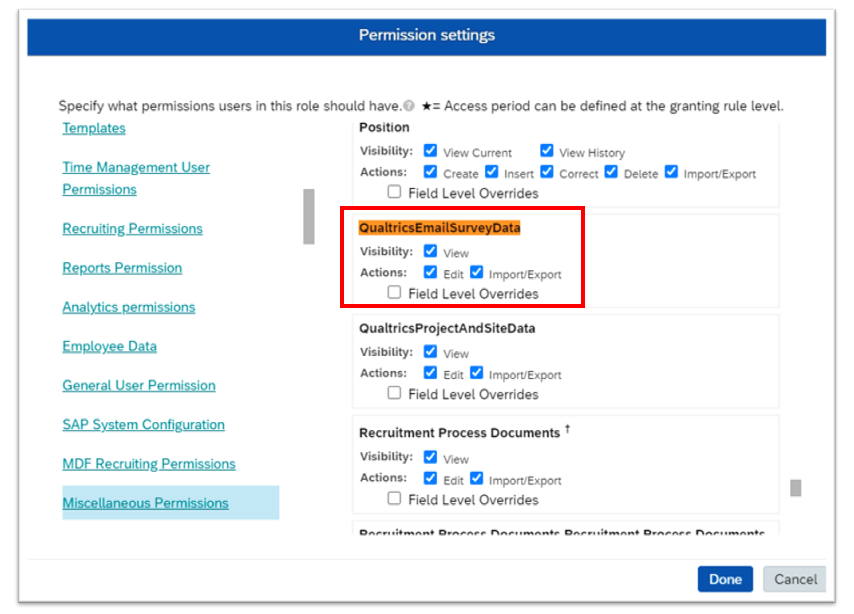
Go to Configure Object Definitions and find 3 objects: QualtricsProjectAndSiteData, QualtricsEmailSurveyJobRespons, and QualtricsEmailSurveyData

For all 3 Qualtrics objects, make sure the following:
Under Security, permission category: Miscellaneous Permissions

If all objects’ configurations are set, you can continue to the next step
Under Miscellaneous Permissions find QualtricsEmailSurveyData to enable access to Email Survey Integrations.
Assign users with View permission.
Assign administrators with Edit permission.
Find QualtricsProjectAndSiteData to enable access to in-app survey
Assign users with View permission.
Assign administrators with Edit and Import/Export permissions.
When finish, Click Done and Save Changes

That’s it, all permissions are set, and you finally can start configuring the integration.
Configuring the integration
Search for Business Scenarios and look for Qualtrics Integration Definition – EC User Export to SFTP and activate the integration.
Click the pencil icon to edit the integration

In the following screens you will configure the integration
Set the Output file type to True SCV

Click Next to go to Configure Fields, find Username column, right click on Username. Then select Edit Calculation

Select Concatenate/Append and then add # following by your Qualtrics instance name.
Example: if your Qualtrics instance URL is https://acme.qualtrics.com, then in text to append is “#acme”

This is important If you want to set up SSO between Qualtrics and SuccessFactors.
In the next step, Destination Setting, fill the relevant SFTP credentials
You only need to fill the SFTP Username


Do not forget to Enable Server-Side Pagination.
Click Next to move to the next step and schedule the integration then run the integration once.
Login to the SFTP and make sure that the user file correctly exported.
Download the integration file and save it. You will need it in the next step.
Tips:
You may find that the integration has some errors due to incorrect field mapping. This can be corrected by changing and correcting the fields associations. you can also add new fields to the integration by requirements.

This is the last step in SuccessFactors integration, let’s move on to Qualtrics.
Qualtrics configuration
In the following steps you will configure the integration in Qualtrics side.
Open Qualtrics instance and go to Directories and click on Employee Directory

Click on New Automation

Name the automation then click Create Automation

Start by scheduling the automation. Usually once or two times per day.

Click Continue
In the next step, set the SFTP credentials. In this example you will use SFTP server.

Click Continue
Insert SuccessFactors SFTP server credentials.

Note: Do not encrypt the file.

When finish click Continue
Mapping SuccessFactors exported file to Qualtrics automation
Now map SuccessFactors exported file to Qualtrics automation.
- Download EMPLOYEE_EXPORT from SuccessFactors SFTP server.
- Click Select File and upload EMPLOYEE_EXPORT file to start mapping the fields.

Make sure that the fields map according to the following list:
Field name Field type
UniqueID Person Unique ID Field
Email Person Field
Username Person Field
ManagerID Person Field (important!)
All the rest of the fields can be mapped as Metadata Field.

When finish click Continue
When done, the following screen displays the automation summary
Click Enable Automation

Run Start Manual Run or Resume Automation

That’s it. All SuccessFactors users will be synchronized to Qualtrics
Conclusion
In this blog I listed all the necessary steps for configuring both SuccessFactors and Qualtrics users’ integration to create 360 XM Qualtrics projects. If you have any questions, contact me at info@aktglobal.com